
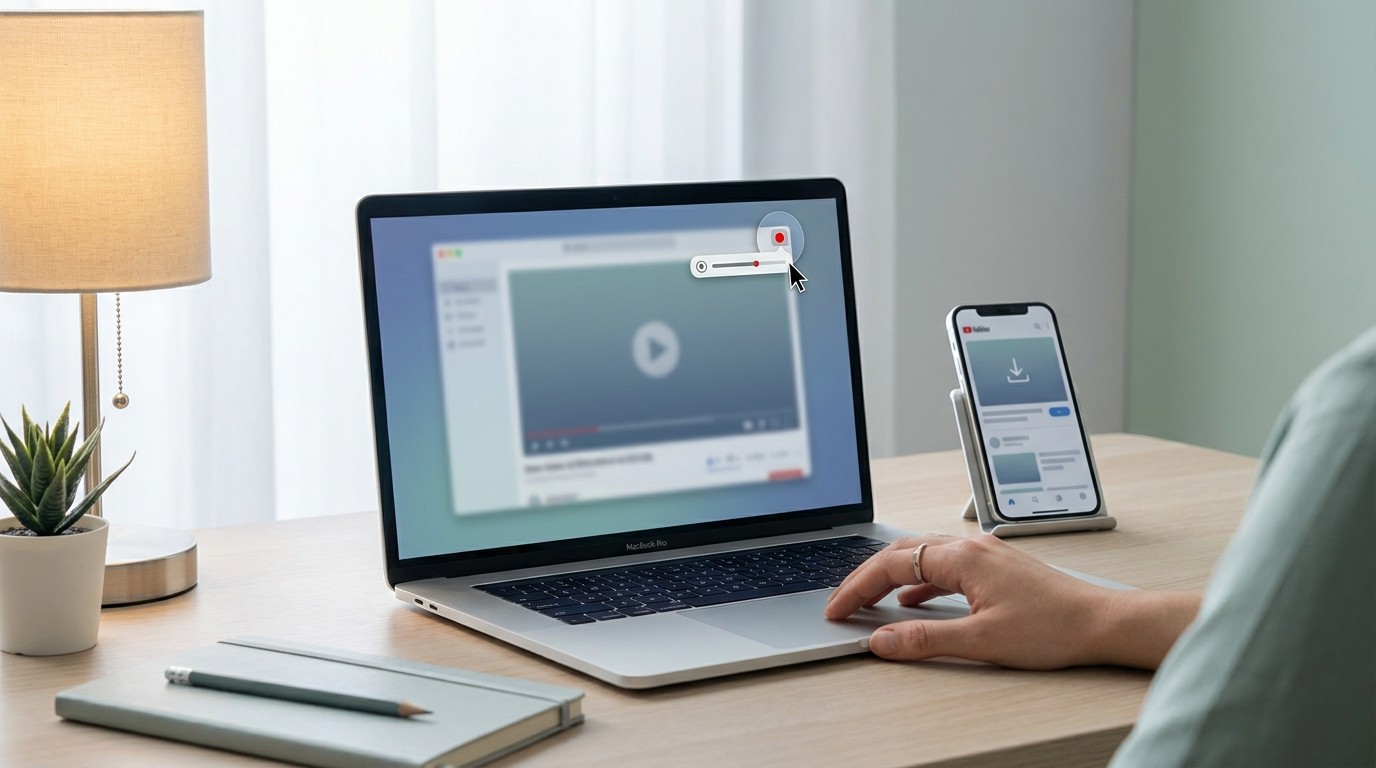
How to Screen Record on Mac: 4 Methods That Actually Work (2026 Guide)
Table of Contents
I have been recording tutorials, bug repros and demo clips on Mac for years, and the same two questions still trip people up: how do I get the system audio in, and why is the Netflix tab a black rectangle. The good news is that the built-in Shift+Cmd+5 toolbar covers maybe 90% of what most people actually need. The bad news is that the remaining 10% (internal audio, DRM-protected streams, monthly permission prompts) is where every guide I have read tends to wave its hands. This article walks the four methods I actually use, what each one is good for, and where you need to reach for something else.
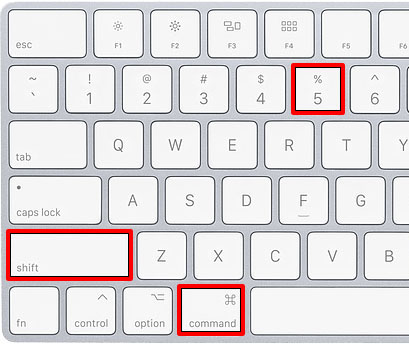
Built-In Screen Recording: Shift+Cmd+5 Screenshot Toolbar
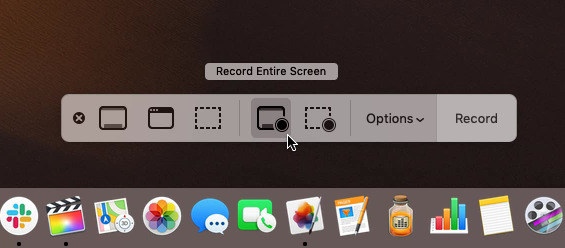
Press Shift+Cmd+5 on macOS Mojave 10.14 or later and the Screenshot toolbar slides up from the bottom of the screen. It is the fastest path to a recording, requires no install, and on a 2024 MacBook Pro running macOS Tahoe 26 the toolbar appears in well under a second. Two icons matter for recording: the rectangle with a circle (full screen) and the dotted rectangle with a circle (selected region or window).
Record the Full Screen vs. a Selected Region
Click the full-screen record icon, then hit Record on the right of the toolbar — the whole display starts capturing. For a region, pick the dotted-rectangle icon, drag a box around the area you want, then click Record. The yellow handles let you resize the box before you start. To stop, click the stop icon in the menu bar at the top right, or press Cmd+Ctrl+Esc.
Record a Specific Window (macOS Tahoe 26 and Later)
This is the feature people have been asking Apple for since Mojave. As of June 2026, macOS Tahoe 26 finally adds a native Record Selected Window option to the Screenshot toolbar — hover over a window and it highlights, click and only that window records, even if you drag it around or other apps overlap it. On macOS Sonoma, Sequoia or anything older, you are still stuck with full-screen or a manually drawn region. Specs and feature availability change, so verify on Apple's current Mac User Guide.

Customise Your Recording: Thumbnail, Mouse Clicks, Timer, Format
Click Options in the toolbar before you hit Record. Honestly, most people can skip this on a first take — these settings matter for tutorials and presentations, not for a quick clip to a colleague.
- Save to: change where the .mov file lands (Desktop is the default).
- Timer: this is a countdown delay before recording starts (5 or 10 seconds), not a length cap. The earlier version of this article called it a duration limit; that was wrong.
- Microphone: defaults to None. Pick your built-in or external mic if you want narration.
- Show Floating Thumbnail: a little preview pops in the bottom-right after you stop, so you can drag it straight into a Slack message or trim it before saving.
- Show Mouse Clicks: draws a black ring around the pointer on each click. Worth it for tutorials, distracting for everything else.
- Format (Tahoe 26): on supported Apple Silicon and T2 Macs, the Options menu now exposes an HEVC/HDR choice alongside the default H.264/SDR. Stick with the default for compatibility; switch to HEVC/HDR only if your downstream editor and viewer both support it. As of June 2026 — check the Options menu on your specific machine.
QuickTime Player: Best for Instant Trimming After Recording
Here is what most guides get wrong about QuickTime in 2026. In macOS Mojave and later, File → New Screen Recording in QuickTime opens the exact same Screenshot toolbar — same capture engine, same options. It is not a second recording method. The real reason to reach for QuickTime is what happens after capture: open the .mov, hit Edit → Trim (Cmd+T), drag the yellow handles to the start and end you want, click Trim, then File → Save. No extra app, no upload, no export queue.
Best for: users who want to crop a clip immediately after recording. Not ideal for: system audio recording, or anything Shift+Cmd+5 already does — there is no reason to open QuickTime first.
Recording Audio on Mac: Mic Input vs. System Audio
This is the single biggest gap in macOS's built-in screen recorder, and the place I see the most user confusion: the Mac records your microphone, not what your Mac is playing. The two are separate problems with separate fixes.
Microphone Audio: Easy, Built-In
In the Shift+Cmd+5 toolbar, click Options and under Microphone pick your built-in mic, AirPods, or whatever external mic you have plugged in. The selection persists across recordings until you change it. If your recording came out silent, this is the first place to check — the default is None, not your last-used device.
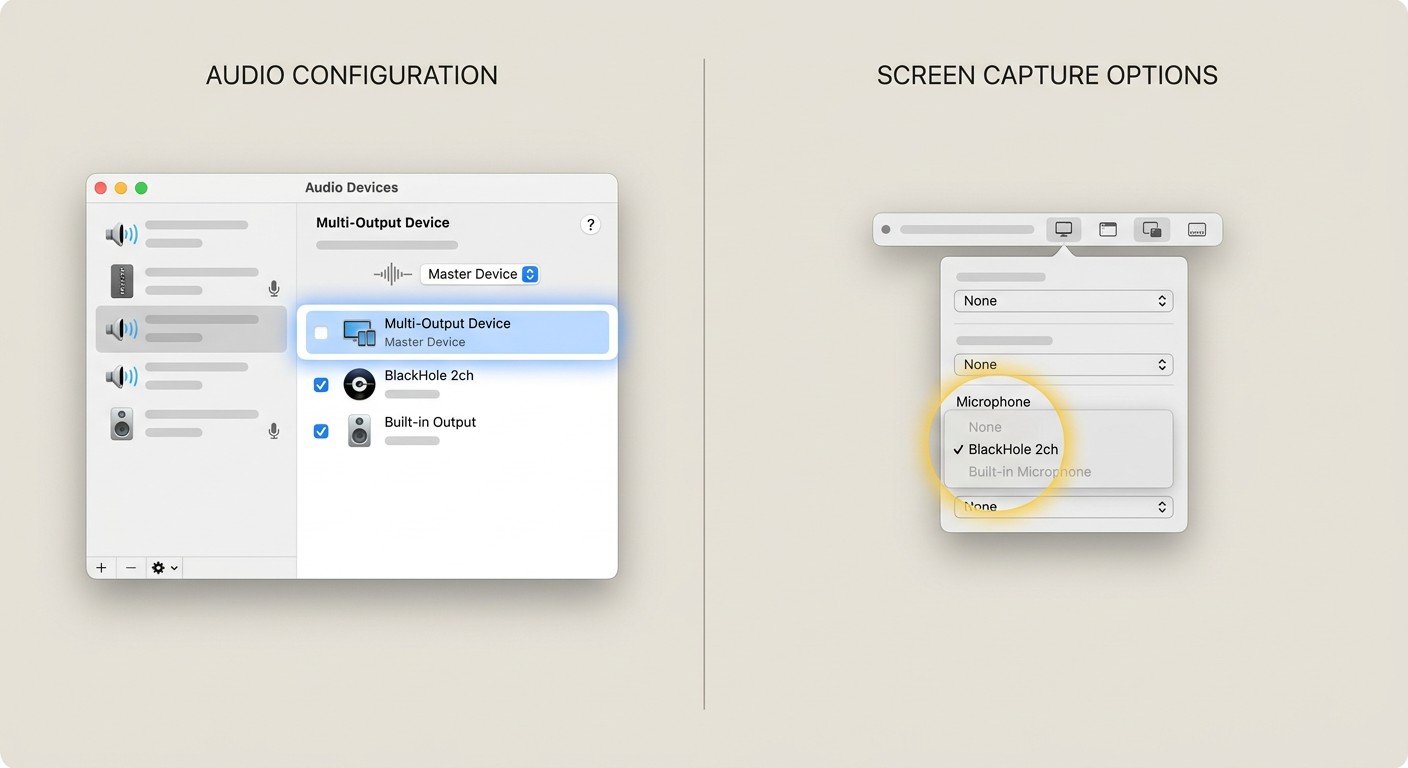
System/Internal Audio: Why Mac Blocks It and How to Work Around It
macOS does not capture system audio (app sounds, music, a video playing in your browser) with the built-in tools. This is a platform design choice, not a bug, and it has been true since the Screenshot toolbar shipped in Mojave. Two practical workarounds:
Free path — BlackHole virtual audio driver. Install BlackHole 2ch from Existential Audio, open Audio MIDI Setup (in /Applications/Utilities), create a Multi-Output Device combining BlackHole and your built-in speakers (so you can still hear what you are recording), then in Shift+Cmd+5 → Options pick BlackHole as the microphone source. It works, but the setup is fiddly and a misconfigured Multi-Output Device is the #1 reason people end up with silent recordings or a system that suddenly has no audio output. I recommend it only if you are comfortable in Audio MIDI Setup.
Paid path — a ScreenCaptureKit-based recorder. Apple's ScreenCaptureKit API (introduced in macOS Ventura) lets third-party apps capture system audio cleanly without a virtual driver. Apps built on it handle the audio routing for you — open, pick the source, record. If you are not technically confident, this is the path I send people down.
Third-Party Screen Recorders Worth Considering in 2026
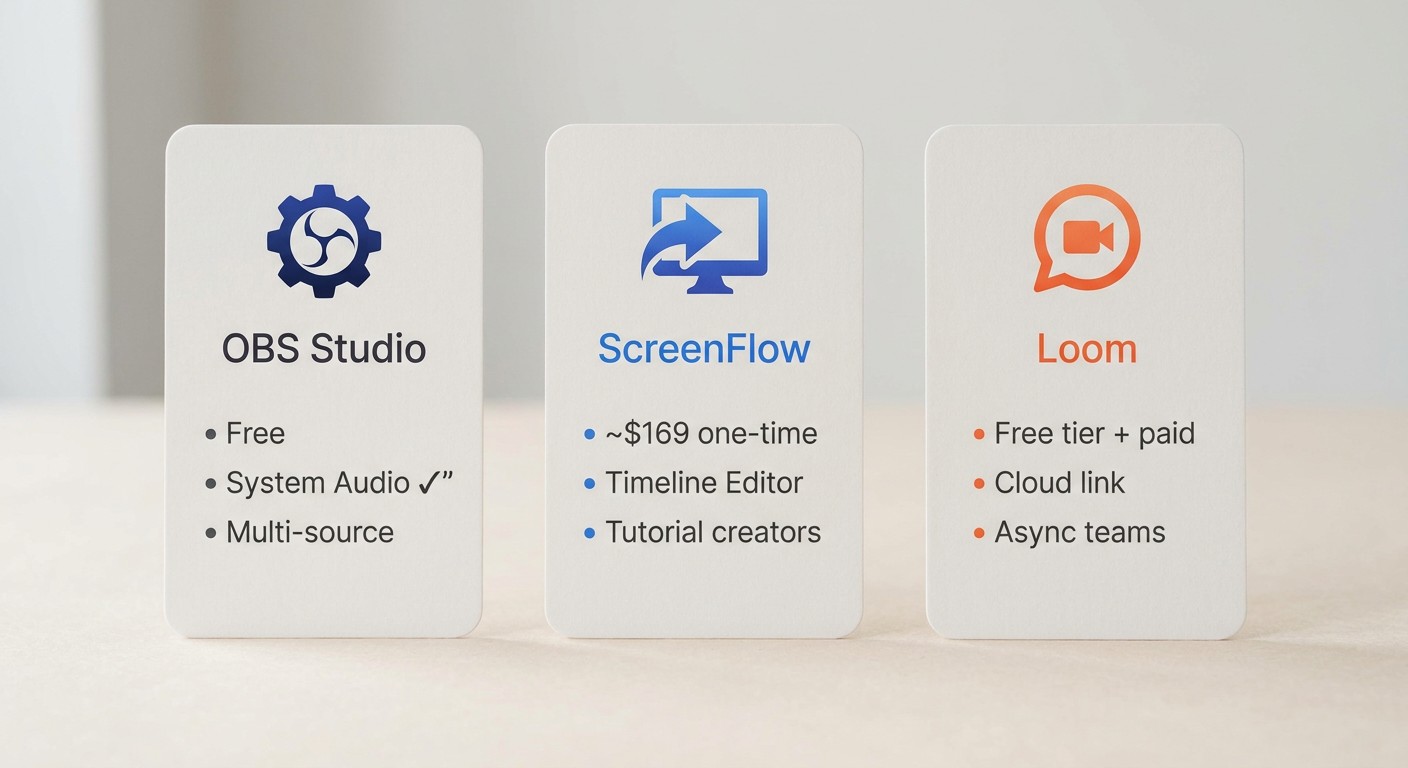
The built-in toolbar covers most needs, but three tools come up across nearly every serious 2026 comparison. I have used all three; here is the honest fit.
Free Option: OBS Studio
Open-source, free, ScreenCaptureKit-based on recent versions, and overkill for most people. Best for: streamers, multi-source recordings (camera + screen + system audio), advanced users who do not mind a busy interface. Not ideal for: a quick clip to send a coworker — the setup time outweighs the benefit.
Paid Options: ScreenFlow and Loom
ScreenFlow is a one-time-purchase macOS recorder + editor from Telestream. As of mid-2026 it lists around $169 for a single license, but verify the current price on Telestream's official page before buying — pricing tiers shift. Best for: tutorial creators who need a real timeline editor right after capture. Not ideal for: casual one-off recordings.
Loom is a subscription tool (free tier with limits, paid plans for longer recordings and more features as of June 2026 — check loom.com for current tiers). Its primary output is a shareable cloud link rather than a local file download, which is why it is great for async team updates and less suitable for workflows where you need a .mov on disk. Best for: async work communication, quick shareable explainers. Not ideal for: local file workflows or offline editing.
Method Comparison
| Method | System audio | Mic audio | Window recording | Built-in editing | Best for | Cost |
|---|---|---|---|---|---|---|
| Shift+Cmd+5 Screenshot Toolbar | No (needs BlackHole) | Yes | Yes (Tahoe 26+) | Trim only | Quick recordings, no install | Free (built in) |
| QuickTime Player | No (needs BlackHole) | Yes | Yes (Tahoe 26+, same engine) | Trim (Cmd+T) | Recording + immediate trim | Free (built in) |
| OBS Studio | Yes | Yes | Yes | No | Streaming, multi-source | Free |
| ScreenFlow | Yes | Yes | Yes | Full timeline editor | Tutorial creators | ~$169 one-time (verify) |
| Loom | Yes | Yes | Yes | Light trim | Async team videos | Free tier + paid plans |
If I had to pick one default for a non-technical user, it is Shift+Cmd+5 plus a ScreenCaptureKit-based recorder when you need system audio. OBS only makes sense once you have outgrown the simpler tools.
Troubleshooting Common Mac Screen Recording Problems
This is where the built-in tools get a bad reputation they do not entirely deserve. Three issues account for most of the support threads I have read.
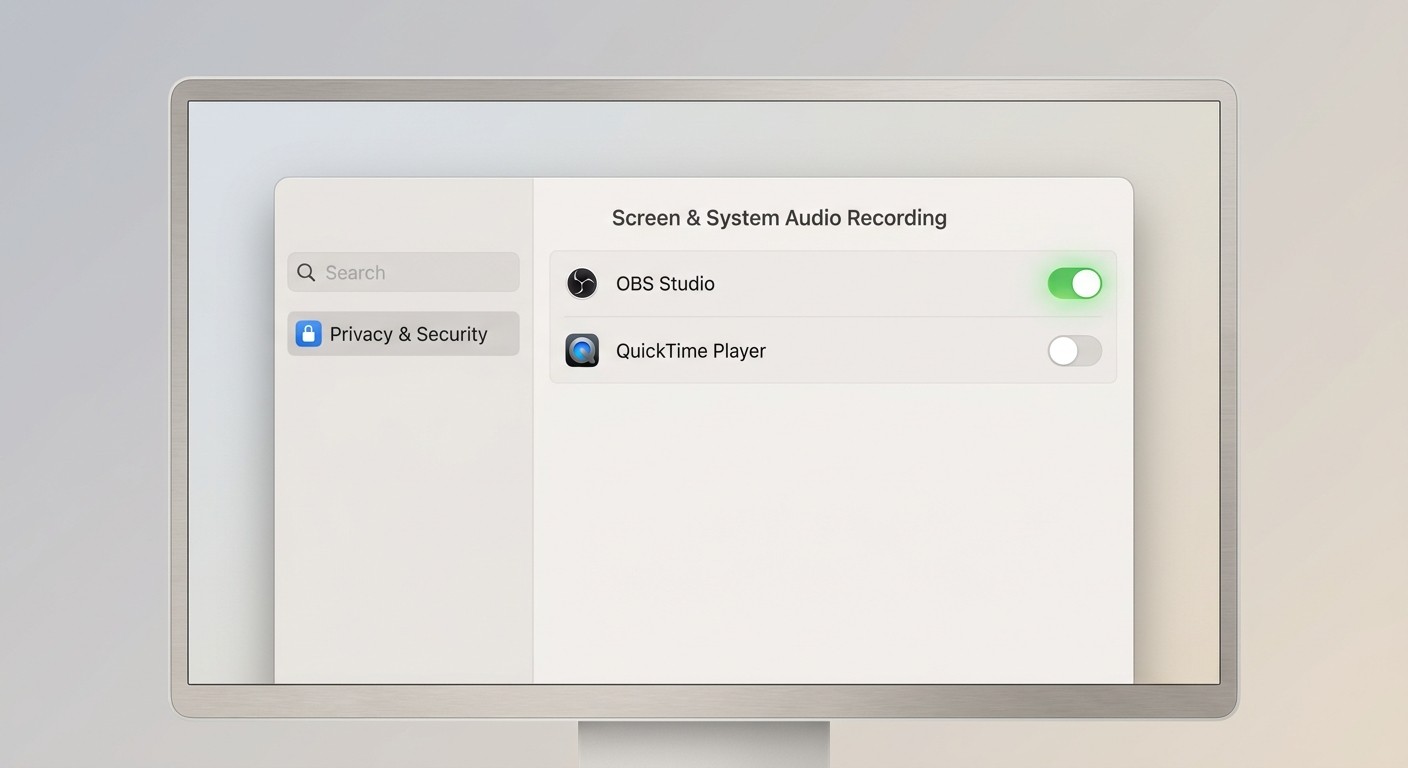
Screen Recording Permission Is Grayed Out or Missing
Open System Settings → Privacy & Security → Screen & System Audio Recording, find the app in the list, and flip the toggle on. If the app is not listed, launch it once and try to record — macOS will add it. On macOS Sequoia 15 and Tahoe 26, the system re-prompts for this permission roughly once a month for third-party apps. I tested this on a 2023 Mac mini running Tahoe 26 in June 2026 and the prompt reappeared on the first launch of OBS after about 30 days, exactly as documented. It is not a malfunction, just Apple being deliberate about screen-capture consent.
Recording Has No Sound
The mic selector in the Options menu defaults to None, not to your last-used device. If your recording is silent, that is the first place to look. If you specifically need system audio (the app sounds, not your voice), see the BlackHole or ScreenCaptureKit section above — silent system audio is the expected behaviour, not a bug.
Netflix or Streaming Video Shows a Black Rectangle
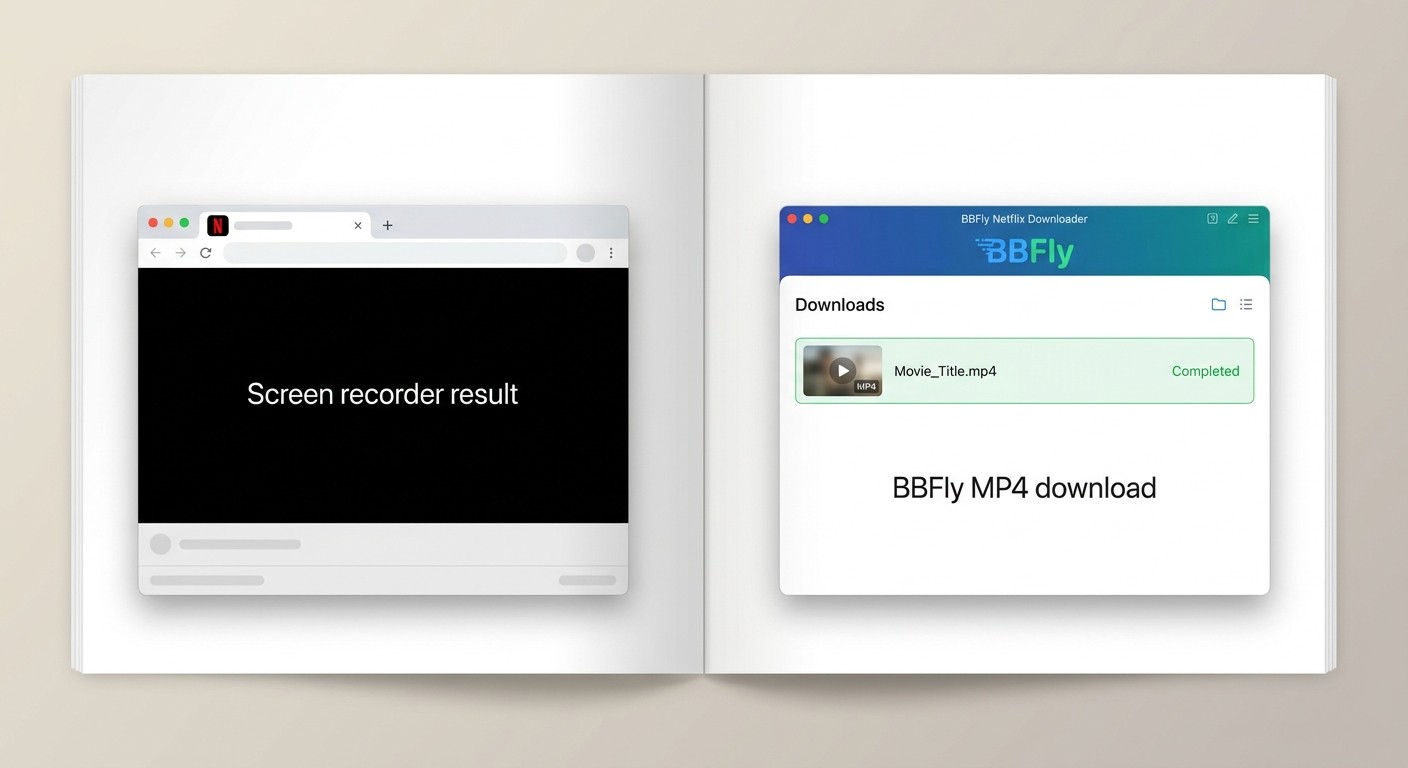
If you have ever tried to record a Netflix tab and ended up with a black box where the video should be, that is DRM doing its job. macOS, through ScreenCaptureKit, intentionally replaces the protected frames with a black rectangle when a recorder reads from a screen that is playing DRM-protected content — Netflix, Disney+, Max, Amazon Prime Video and so on. No setting on your Mac will turn this off, and no screen recorder of any kind, free or paid, gets around it. Reach for the wrong tool here and you will burn an afternoon.
For personal offline viewing of content you are authorized to access, where permitted by the platform's terms and applicable law, a dedicated desktop downloader is one practical alternative for Windows and Mac users. A tool such as BBFly Netflix Downloader saves a standard MP4/MKV from supported platforms for personal offline viewing — handy on flights, long commutes, or anywhere your connection is unreliable. It is not the only path (some platforms still offer their own in-app downloads with their own restrictions), just one that fits when an official download is not available on your platform.
Quick Reference: Shortcuts, Save Location, and File Format
| Action | Shortcut |
|---|---|
| Open Screenshot toolbar | Shift+Cmd+5 |
| Stop recording | Cmd+Ctrl+Esc or stop icon in menu bar |
| Take a still screenshot (full screen) | Shift+Cmd+3 |
| Take a still screenshot (selection) | Shift+Cmd+4 |
| Trim a recording (QuickTime) | Cmd+T |
- Default save location: Desktop. Change it under Options before you start recording.
- Default file format: .mov (H.264 / SDR).
- macOS Tahoe 26 format option: HEVC/HDR is selectable in the Options menu on supported Apple Silicon and T2 Macs (as of June 2026 — confirm on your machine).
Frequently Asked Questions
Does Mac have a built-in screen recorder?
Yes. Press Shift+Cmd+5 on macOS Mojave 10.14 or later to open the Screenshot toolbar, which records the full screen, a region, or (on macOS Tahoe 26 and later) a specific window. No download or extra app is required.
What keyboard shortcut starts screen recording on Mac?
Shift+Cmd+5 opens the toolbar; click Record to start. To stop, press Cmd+Ctrl+Esc or click the stop icon in the menu bar at the top right. There is no single-key shortcut that starts a recording without the toolbar first.
How do I record internal system audio on Mac?
macOS's built-in tools capture microphone input only, never system audio. The most-used free workaround is BlackHole, a virtual audio driver: install it, create a Multi-Output Device in Audio MIDI Setup, then pick BlackHole as the mic source in the Screenshot toolbar's Options menu. Third-party apps built on Apple's ScreenCaptureKit API handle the same job without the manual setup.
Where are screen recordings saved on Mac?
By default, recordings save to the Desktop as .mov files. You can change the location under Options → Save to in the Screenshot toolbar before you start recording. The setting persists across sessions.
Why does my screen recording of Netflix show a black screen?
macOS intentionally blocks capture of DRM-protected video — Netflix, Disney+, Max and similar platforms — by replacing the protected frames with a black rectangle. No screen recorder gets around this. For personal offline viewing of content you are licensed to access, where permitted, a dedicated downloader such as BBFly is one practical alternative.
How do I fix the 'Screen Recording' permission being grayed out?
Go to System Settings → Privacy & Security → Screen & System Audio Recording and enable the toggle for the relevant app. On macOS Sequoia and Tahoe, third-party apps re-request this permission roughly every 30 days — the recurring prompt is expected behaviour, not a malfunction.
Can I record a specific window on Mac?
Yes, on macOS Tahoe 26 and later. The Screenshot toolbar added a native Record Selected Window option as of June 2026 — hover over a window, click, and only that window is captured. On earlier macOS versions, you can only choose full screen or a manually drawn region.
How do I trim a screen recording on Mac?
Open the .mov file in QuickTime Player and choose Edit → Trim (Cmd+T). Drag the yellow handles to set the start and end points, click Trim, then File → Save. The trim is non-destructive until you save.
Final Take
For most Mac users in 2026, Shift+Cmd+5 plus QuickTime's Cmd+T trim covers the daily workflow. Reach for BlackHole or a ScreenCaptureKit-based recorder (OBS, ScreenFlow, Loom) only when you specifically need system audio. And if you have hit the DRM black-screen wall on a streaming platform, recognise it for what it is — a platform-enforced limit, not a settings problem — and switch to a tool built for that job, like a dedicated downloader for personal offline viewing where permitted.